danna (curious tangles) - View my most interesting photos on Flickriver
Showing posts with label craft. Show all posts

Monday, March 26, 2012

Seed Birds and Volcanoes for Guerilla Gardening


This Spring Break we got excited about making wildflower seed balls to throw into a local empty field. This Heal This Field poster was our inspiration.  We ended up with a lot of experiments and variations, some of which turned out great.

This fuzzy Seed Bird is one of the favorites, covered in aster seeds and filled with wildflowers seeds, it will almost be a shame to turn it loose in the earth. But the reward will be flowers later this summer.

To make the seed balls we used newspaper mush and wildflower seeds. We also used toilet paper tubes, paper bags, napkins and rice glue. Many tutorials on making Seed Balls are out there on the interwebs. This one that uses newspaper was our inspiration.  We made our own rice glue from short grain rice. It's basically free and will dissolve in the rain allowing the seeds to sprout out. Instructions for making rice glue were found here.


As usual, the project somehow turned into a experiment and creativity fest. Some seed balls did take the standard ball shape, but of course we weren't content to sticking to one shape.

Some seeds were sandwiched between paper and covered in rice glue and formed to a jar lid shape. The hope was they would fly like flying seed discs.  This had only limited success. Maybe if they were bigger with more weight. The rice glue really makes the paper hard as anything.

One of these discs ended up as a mushroom. The red discs have tomato seeds in them. Next time I think I will make seed balls with more vegetable seeds in them. I will have to research which vegetables would fair well in an unattended field. 

The Seed Birds are newspaper mash with seeds formed into a simple bird shapes then covered in scrap paper using rice glue.  The color really added the needed cuteness factor.

We dipped the beaks into a turmeric and rice glue mixture.

This is one of my favorite little birds, it may be hard to let it go flying away into a field somewhere. The ones in the background were covered in rice glue then rolled in aster seeds.

The owls were made of toilet paper tubes stuffed with seed mash and covered with brown paper or tissue.  More detailed information on making this owl can be found here.

Some newspaper balls were wrapped with Keep Canada Clean messages. These were made with lavender seeds I'd saved from my lavender plants. The newspaper mash smells wonderful as bits of flowers and leaves were mixed in.


Seed sticks with a message like 'Keep Canada Clean' or 'Plant Flowers not Garbage' were made by using rice glue to stick seeds onto scraps of paper. The ones that turned out nicest were formed around straws so it made a neat spiral tube.

The seed volcanoes are pretty much my favorite ones though. They are so festive and exciting looking.

We pressed the mash into cone shapes using a small plastic funnel as a mold, tore strips of red paper and used rice glue to give the vocano lava.


With spring rain coming today, and warmer weather in sight,  we'll see how long it takes this one to sprout.

The cat grass seed bomb amuses me as it really is cat grass seeds around the base. Maybe catnip would be more useful and appreciated. Not only could you plant flowers, you could lure cats away from your vegetable garden.


I hope you enjoyed our variations on the seed ball. This is a fun activity for kids and the crafty, and don't forget the second part of the project which is the planting. Think about taking this project the extra step by visiting a nearby field that needs cleaning up, pick up some garbage and then plant some wildflowers.

Plant Flowers not Garbage!

How to make the Seed Owl

The Seed Owl is made of a toilet paper tube and brown paper. Newspaper seed mush went on the inside and rice glue was used to stick it all together.

Cut a toilet paper tube like so. Save the left over portion for wings.


Pack the seed / newspaper mache into the base of the tube, using your hand to keep it from going out the bottom.

Use the rice glue and paintbrush to cover the outside (including sealing the bottom off) with used fast food bags of brown paper or other recycled paper.
Fold the front part down and into the center. Fold the pointed part over that.

Crease the pointed side parts (horns of horned owl) so that they stand up straight.

Use a rubber band to hold the flap down as it dries.

Cut the leftover toilet paper tube into this double wing shape and cover it with rice glue and brown paper.
Use the rubber band to secure the wings on until the owl dries. I ended up placing the owl in a small bowl to dry so the wings stayed curved forward.
Here's the finished owl. Pretty cute for something that will be thrown into a field to become wildflowers. 

The pennies as eyes were a last minute idea, but something that decomposed would be better. My original thought was to use seeds or construction paper eyes.


We also went on to make a large variety of seed carrying objects and experiments.

This little bird was made of a toilet paper roll and covered with paper. Then sprinkled with aster seeds. The nest is old brown napkins rolled up into ropes and glued on (all rice glue).


If you want to try this bird, here's a general idea of what I did.

Now all we have to do is wait for it to sprout!

Friday, December 16, 2011

Merry Christmas!

In our city, they broadcast a fire place scene on TV all during the Holidays. It even has a flanneled arm reach out and poke the logs so they burn better.  We don't have a fireplace but we do have one of those huge deep old T'V's which takes up so much room.

So I made a faux fireplace surround for our TV out of cardboard. I printed out a pattern of natural stone and granite and Mod Podged it onto the boxes.  We had been given a slab of wood which I used for the mantle, but  you could make that out of cardboard as well.
I really like it and it gives our Living Room a totally different look than having that old TV sitting out. Plus now there's a real place to hang our stockings.

Here are some home made Origami ornaments we folded up. My daughter is 10 and really enjoyed this. It's much easier than you think and once you master it, you can really churn them out. Click  here for the folding pattern, it is called Good Luck Box from Richard Alexander. You can make some modifications to this pattern as we did to get different looks.


Have a Merry Christmas!

Sunday, December 4, 2011

The Barbie's Christmas Nativity

Back in 2008 my daughter was 7 and I got inspired to make a Barbie's Nativity Scene. I never got pictures of the finished display,  but with a little digital enhancement, I present to you the Nativity Scene re-enacted by our "Barbino" Family and Friends. 


Merry Christmas!

Thursday, November 24, 2011

Pink and Blue Crocheted Afghan

I crocheted this afghan over the last year during my visits to my Mom. She wanted to make just one more afghan for my daughter, and so we went out and picked out the yarn. Mom ended up being the inspiration and moral support, and I got to crochet something while we visited. The bright blue is one of my daughter's favorite colors and I somehow felt it needed an even brighter pop of colour so I picked pink. I wasn't too sure about the color choices, but my daughter loves it, so all is good. It's big enough to use for a spread on her bed and really thick and warm since this pattern kinda doubles over on itself.


So, now I've kept the dogs off of it long enough to get pictures...
and it will begin its real life on a bed covered in dogs and eventually dog hair.
Posted by Picasa

Tuesday, November 8, 2011

Putting away Halloween till next year.

I think I've finally put away the final things from Halloween. Every day I think I've got it all, then just one more thing comes to the surface. Now I realize I have this huge orange inflatable love seat in the middle of my living room, but it sure is fun to turn upside down and jump on. Here it is up in the apple tree. Maybe one more day will have to go by with Halloween on the brain. 

Here's some more random pictures of our yard. I really am getting a bit carried away, but it sure is fun. We do it for the little kids, so it's not all that scary here, more just neat to look at.


I weave this spider web in this spot  each year. There's something relaxing about weaving a web.


Mr. Wrinkles isn't all that spooky in the daylight, but at night we had him digging up the bones of the dead. With christmas lights coming up out of the ground. 

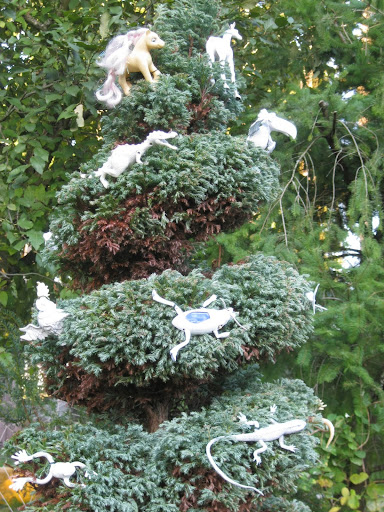
Our spiral boulevard cypress became a march of white animal ghosts up to the great beyond. Definitely have to expand on this idea next year.

Eboneezer and Ophelia hung out at the top of our driveway this year. Here's the very little headed man, the hippy and Medusa. Check out those hippy pants! I had great fun making them.
There's a column in the middle of our living space - we wrap it in different things depending on the season. Sometimes wrapping paper, but this year it was black cloth for Halloween. Then we drew on it with chalk as if it was a blackboard .

That apple was a great amusement to one 10 year old. "Boy this apple has a bite to it!"


This is an old outdoor light sphere, drawn on with sharpie and lit up from the inside. Quite effective, although this photo doesn't do it justice.
My friend made this brilliant spider from packing tape.  He made a balloon form and newspaper form for the legs. Wrapped them in clear plastic wrap, then clear packing tape. Cut apart the final form and remove the paper then tape it back together.  This is by far my favorite Halloween decoration.

He also made this great little guy from a butternut squash. Even better we got to eat him the next day - yum.


Hope you had a fun one. Happy Halloween till next year!


LinkWithin

Related Posts Plugin for WordPress, Blogger...